Software installation
Software installation
After installing your HDD(s), giving the unit power, connecting it to the Ethernet and powering it up, after a few minutes the HDD LEDs will go blue and you'll here one beep. The device is ready for setup. What you want to do is install the SmartNavi software, it will detect and install the device.
We obtained a beta version of the new software which has been completely overhauled. The new batches should get this more advanced software. Anyway, pop in the supplied CD-Rom and install SmartNAVI.
Insert the login and password (admin:admin) and login the the software and it's versatile options.
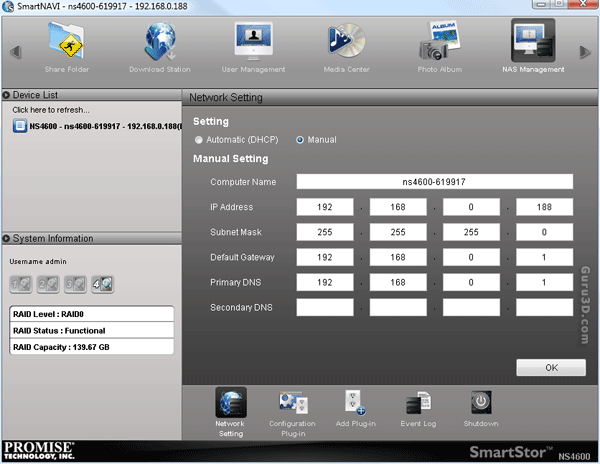
Click on the SmartNavi icon on your system tray and the all new SmartNavi GUI will load up. You can follow a simple wizard to setup your device and configure it in your network. The NS4600 will detect and setup DHCP lease if it can.
You probably want to manually lock it at a certain IP though as you do not want your NAS unit constantly located at another IP after each router restart. Just tick the 'Manual' bullet and hit OK. From now on this device is locked in at 192.168.0.188 or the IP you assign to it.
On the topic of routers. Would you like to have your public web-content and say FTP available on the internet, then in the router setup open up TCP ports 80 and 21 for IP192.168.0.188 after which your router will redirect all in and outgoing requests to the assigned IP.
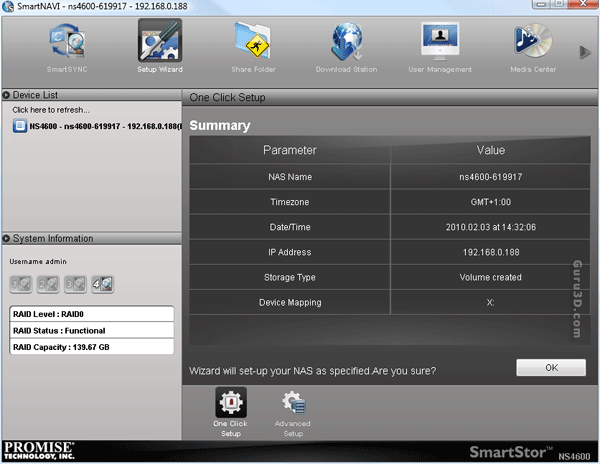
After a few steps like network options and time zone configuration we do a one click setup of the HDD. We have a WD VelociRaptor installed and it's setup automatically as RAID0 (stripe) unit.

Here we can verify that. Adding more devices will create an optional big RAID0 unit, or with say three drives you'd go RAID5 for more redundancy.

Once the NS4600 went through a couple of setup stages you'll notice that certain network shares have become available within your Windows installation. All accessible based on your admin logon.
It's time to create some new shares though and make things a little more private.
