Page 5
I knew it, you are a guru alright ...
Advanced users should read on as the SnapServer 1100 has way more options since it's acting as a server. We will not go through all options as it's simply too much we have time for. Anyway, once we are logged into the web administrator's interface we can choose a plethora of options.
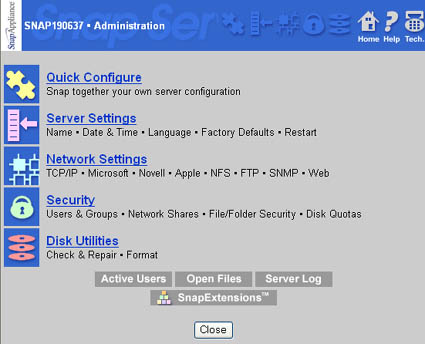
We'll quickly go trough the 5 main administration options which are:
- Quick Configure
- Server Settings
- Network Settings
- Security
- Disk Utilities
Quick ConfigureIt's in the name. It'll take you step by step through very basic settings like Server Name, timezone, time (can sync to your client PC) password settings. If you did not get an IP assigned through your router or you simply want to assign an IP yourself, then you enter the necessary data manually here. That would be IP Address of the server, SubnetMask and gateway. One of the last steps is choosing networking environments (Microsoft, Novell, Apple, UNIX). limit this option to what you need. Since we are a Windows XP user we flag Microsoft Networking. Once that one is selected we set the proper workgroup name. The next step in this setup is enable Web services for all users. You can opt to allow all users within the network to access the Snap Server home page and all public folders on the Snap Server's drives through a web browser. Reading all this back it must seem complicated, believe me it's not.
Server Settings
I can and will be brief about this option. Here you can configure all server options manually, options are:
| Server Name | Change the name of this server |
| Date/Time | Change the date and time of this server |
| Language Support | Specify which language to use for this server |
| Failure Notification | Snap Server can notify you in the event of a server error |
| UPS Support | Configure automatic shutdown using a UPS |
| Server Restart | Restart this server |
| Power Off | Power off the system |
| Factory Defaults | Reset server settings to factory defaults |
| Save/Restore Configuration | Save or restore server configuration (for backup) |
| OS Update | Update the operating system on the server |
What I found quite interesting was that option that the Snap Server can notify you in the event of a server error through email. You fill in an SMTP IP number (your ISP SMTP or internal SMTP) + and email address and voilla you are set to go. Really interesting feature.
Network Settings
Once we enter the option Network setting things tend to get a bit more complicated.
| TCP/IP | Change the TCP/IP address of this server |
| Microsoft Networking | Configure Microsoft-compatible networking |
| Novell Networking | Configure Novell-compatible networking |
| Apple Networking | Configure Apple-compatible networking |
| UNIX NFS | Enable or disable NFS |
| FTP | Configure this FTP server |
| SNMP | Configure this SNMP server |
| Web | Configure this Web server |
TCP/IP we've already setup, either DHCP picked them up or you entered it in the setup (IP/Gateway/Subnet). In Microsoft Networking we again have options that we already entered in the quick setup. Here you enter a workgroup/domain and TCP/IP & NetBeui.
As stated we did not enable Apple, Novel and UNIX networking so we are skipping these. In the FTP option we can en/disable FTP. At default it's enabled. With your FTP client (CuteFTP) simply point towards the IP and then use root as username with your configured password. Once logged in you'll have full access rights towards the maps shared. This FTP is primitive (not much to configure) to setup yet is handy when you need to access some files at a remote PC. Don't forget to map port 21 towards the SnapServer 1100 assigned IP in your router. For the FTP do not forget to disable anonymous users, if you choose to do this. As stated the FTP server is very primitive. No option to alter ports or easily assign user accounts and groups specific for the FTP. All that is handled in the security part of the admin control panel.
We can do the same with Web services. Again you can allow to access (read only) your files at http:// level. Within your LAN this is quite safe. But again you can assign port 80 in your router towards the SnapServer to be able to access the snapserver and it's shared files/maps from your neighbours internet connection. You can setup the 1100 in a variety of ways. Protected, non protected, with(out) administration links. If you choose to make the 1100 publicly available then be darn sure what you are doing. Test everything twice to make sure all is secure. I discourage to use the web option over a WAN if you are not sure what you are doing.
