Product showcase – Interior
Product Showcase - Interior


Typically (in older cases), you’d need to remove the motherboard to install a new cooler. The giant cutout for your cooler’s backplate should make life easier. With the abovementioned solution, you can reach it from both sides without the unpleasant experience of removing your motherboard from the chassis. You must remember to install the PSU afterward, as it will block the cutout.

There is a metal cable duct on the right side of the motherboard and a small tempered glass panel.

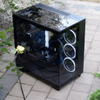
You can see a place at the side for three 120 mm fans (pre-installed) or install an LCS, provided it’s nothing more extensive than a 360 mm rad.


A 120 mm fan is pre-installed at the back. It’s powered by a 3-pin cable (that’s fine), non-RGB. Luckily there’s no Molex connector, so guys from NZXT corrected another thing. You can easily mount a 120 mm AIO in there instead.

The case has seven PCI card slots secured with screws (no thumbscrews).


At the top of the chassis, there’s a place for up to 360 mm radiator (but it should be a thin one) or 3x 120 mm fans/2x 140 mm.

A similar configuration is applicable for the bottom.
