Overclocking the ASUS ARES
Overclocking & Tweaking
As most of you with most videocards know, you can apply a simple series of tricks to boost the overall performance a little. You can do this at two levels, namely tweaking by enabling registry or BIOS hacks, or very simple, tamper with Image Quality. And then there is overclocking, which will give you the best possible results by far.
What do we need?One of the best tool for overclocking NVIDIA and ATI videocards is our own Rivatuner that you can download here. If you own an ATI or NVIDIA graphics card then the manufacturer actually has very nice built in options for you that can be found in the display driver properties. Based on Rivatuner you can alternatively use MSI AfterBurner which will work with 90% of the graphics cards out there. We can recommend it very much, download here.
Where should we go?
Overclocking: By increasing the frequency of the videocard's memory and GPU, we can make the videocard increase its calculation clock cycles per second. It sounds hard, but it really can be done in less than a few minutes. I always tend to recommend to novice users and beginners not to increase the frequency any higher then 5% of the core and memory clock. Example: If your card runs at 600 MHz (which is pretty common these days) then I suggest you don't increase the frequency any higher than 30 to 50 MHz.
More advanced users push the frequency often way higher. Usually when your 3D graphics start to show artifacts such as white dots ("snow"), you should back down 10-15 MHz and leave it at that. Usually when you are overclocking too hard, it'll start to show artifacts, empty polygons or it will even freeze. Carefully find that limit and then back down at least 20 MHz from the moment you notice an artifact.
All in all... do it at your own risk.
So once you picked up the card you should install the latest version of SmartDoctor, ASUS's proprietary tweak utility. It's not exactly the most stunning looking tweak and neither is it user-friendly. But it gets the job done. Inside the application, properties allow voltage overclocking, and then as you can see in the screenshots above, you get a unlocked voltage sliders for GPU core and graphics memory, allowing you to increase the voltage towards 1.3 Volts (which we applied).
| Radeon HD 5970 | This sample | Overclocked |
| Core Clock: 725MHz | Core Clock: 850MHz | Core Clock: 993MHz |
| Shader Clock: 725MHz | Shader Clock: 850MHz | Shader Clock: 993MHz |
| Memory Clock: 4000MHz | Memory Clock: 4800MHz | Memory Clock: 5300MHz |
So normally with a reference 5970 based card you'll push an average overclock at 850~900 MHz. This card is already clocked at default at these speeds.
The card allows GPU voltage tweaking. The voltage regulation will bring you close to 1 GHz though, anything higher say 1025 MHz would bring is stability issues for us. We ended at 993 MHz on both GPU cores. The memory overclock was a little disappointing, the ASUS software does not allow any DDR volts tweaking, we could only apply a 1325MHz clock frequency (x4 QDR). Still overall it is a very nice overclock alright.
Mind you that our overclock results are never a guarantee for your tweaking experience. Systems differ, products differ and batches can differ. You could get the very same, lower or even higher results.
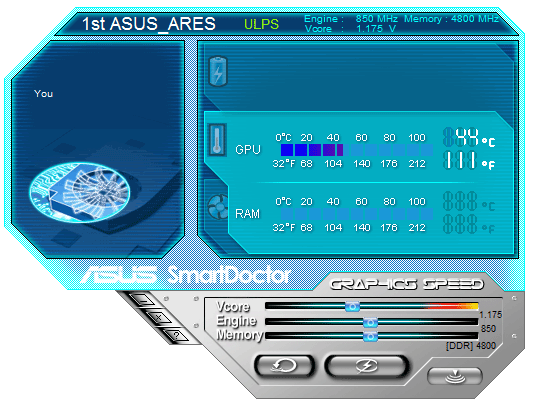
For overclocking you'll need the ASUS SmartDoctor software. Not the most award winning software in the world. But it'll get the job done. We voltage tweaked the GPUs towards 1.3 Volts by the way.
To proof that 993 MHz on the GPUs and 5300 MHz on the memory was a stable overclock we'll include the results of all our test overclocked in the charts as well.
