VRM Stage Testing - UEFI BIOS Features
VRM Stage Testing
There are no VRM zone temperature sensors (at least according to HWinfo), so we had to measure the temperature with an infrared thermometer. The test conditions were simple, run LinX for 30 minutes and CPU PPT equal to 110 W. There was no air blowing over the radiator area and the built-in small fan did not turn on because the temperature of the MOSFETs did not exceed 60 degrees. It certainly sounds strange, "no temperature sensor, but the fan will turn on after 60 degrees".
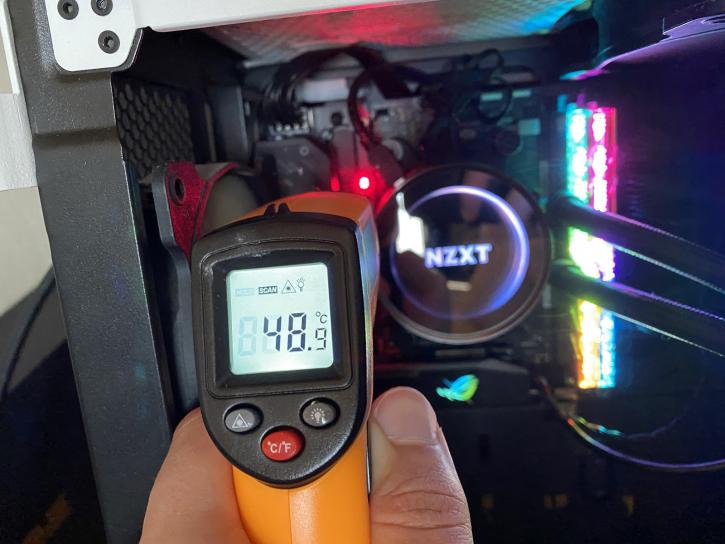
Of course 49 degrees is an excellent value for the overclocked 4650G (CCX1 4350 and CCX2 4325). LLC was too "soft", with LLC6 mode the voltage drop in LinX was 2% (1.35V). The maximum LLC value on this board is 8k, which will allow it to reach zero Vdrop.
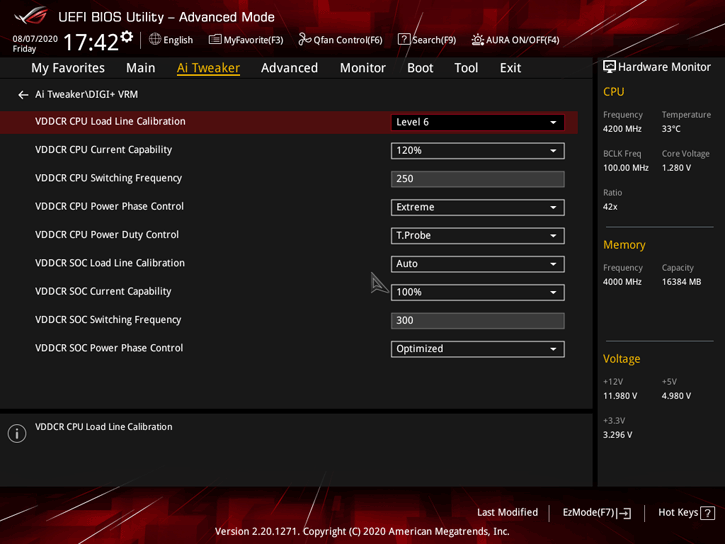
The DIGI+ menu is plain and allows you to configure all the most important parameters. Optimal settings, in my opinion, I have presented in the following screenshot.
In the end, this motherboard will be enough for all Zen2 processors in the stack, provided the case is well ventilated. About overclocking the 3900X, 3900XT and 3950X, I would advise you to forget or choose a more appropriate motherboard because the Mini ITX is in a completely different weight class and its targets are different.
UEFI BIOS Features
I would not recommend skipping through this page as all the information in this section indirectly affects the performance of your system.
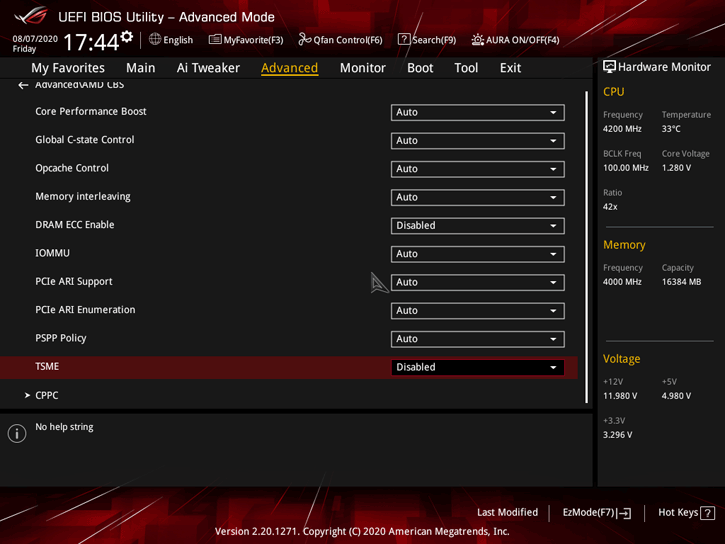
Secure Memory Encryption (SME) is an extension of the x86 instruction set provided by AMD to support encryption of pages in granular memory using a single ephemeral key. A subset of SME, Transparent SME (TSME), is a more limited form of SME used to transparently encrypt all physical memory. Secure Encrypted Virtualization (SEV) extends SME to AMD-V, allowing individual virtual machines to run SMEs with their own secure keys. This is the first feature that a normal PC user should turn off because it significantly affects latency and memory bandwidth. This item is often found in the AMD CBS menu.
This is followed by some curious functions such as CPU Core Current Telemetry and CPU SOC Current Telemetry. Functions allow you to deceive the CPU and make it boost even more. The mechanism of work is extremely simple. CPU boots are always dependent on 4 variables which are limiters. One of the most important variables is current (EDC), in our case we can tell the processor that it gets for example 120 or 100 instead of 140A. According to this, the PPT limit will not be reached either and the processor will decide to ramp up to the factory value. Of course, you will get more performance but at the cost of additional VRM load and a bit more heat than you could expect. The original purpose of these functions was to calibrate the VRM. Now it's a way to differentiate your motherboard from the crowd. More recently, an enthusiast with nickname Stilt suggested to author HWinfo to introduce Power Reporting Deviation monitoring. The value is measured as a percentage, the normal value in the load always corresponds to a range of 95-105%. This tells us that there is no motherboard fraud. But there are situations where the value is even 50%. Some motherboard manufacturers have conscientiously started offering users the possibility to calibrate telemetry themselves, and some have even tried to prevent the HWinfo program from working.
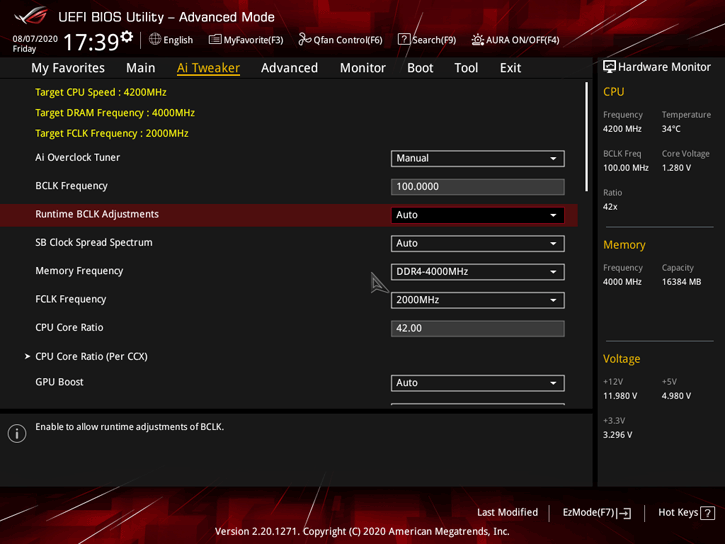
Without a separate clock, ASUS ROG STRIX B550-I GAMING can still adjust the BCLK to 118MHz inclusive. SB Clock Spread Spectrum - disabling this function will improve the stability of the RAM overclocking and stabilize the bus at 100 MHz. Price? Bigger EMP. For those who like to use and BCLK in overclocking, I want to remind you that after 103.4 MHz there will be " fall down" nmve drives, if they are in the system.
CPU Core Ratio, aka CPU overclocking by individual frequency setting for each CCX. A very useful feature that will take the Matisse receiver to the next level with its output, allowing you to customize the frequency and voltage for each core.
Boost GPU is designed for manual overclocking of the built-in GPU. No one will have a problem with it. You set the frequency, set the GFX and SOC voltage, that's it. As for the voltage limits, I advise not to exceed the SOC voltage over 1.35V and for the GFX 1.25V, as we are dealing with a more delicate 7nm process. Otherwise, overvoltage will cause the degradation process. It is slow, but who would want their processor to stop taking extra 100MHz on the GPU or 400MHz on the RAM in a year.

The last important menu item I would like to tell you about is NB Configuration. iGFX Multi-Monitor, which allows you to switch between the integrated video and discrete graphics card. In particular, it is possible to leave both devices active. If you forgot to configure this item - it doesn't matter, the BIOS will select the mode itself depending on where the DP or HDMI will be connected.
UMA Frame Buffer Size - forced setting of RAM volume that will be reserved for iGPU needs. The maximum value is 8 GB. My advice - 3Gb, will be quite enough.
