Graphics Card Thermal Imaging Measurements (FLIR)
Thermal Imaging Temperature Measurements
A new addition to our reviews will be the inclusion of Forward Looking Infra Red thermal images of hardware. Over the past years we have been trying to figure out what the best possible way is to measure temperatures on hardware. Multiple options are available but the best thing to do is to visualize heat coming from the product or component being tested. The downside of thermal imaging hardware is simple, FLIR camera's with a bit of decent resolution costs up-to 10,000 EUR. Hence we passed on it for a long time. With a thermal imaging camera a special lens focuses the infrared light emitted by all of the objects in view. This focused light is scanned by a phased array of infrared-detector elements. The detector elements create a very detailed temperature pattern called a thermogram. It only takes about one-thirtieth of a second for the detector array to obtain the temperature information to make the thermogram. This information is obtained from several thousand points in the field of view of the detector array. The thermogram created by the detector elements is translated into electric impulses. The impulses are sent to a signal-processing unit, a circuit board with a dedicated chip that translates the information from the elements into data for the display. The signal-processing unit sends the information to the display, where it appears as various colors depending on the intensity of the infrared emission. The combination of all the impulses from all of the elements creates the image. We can seek hotspots on the PCB indicating, for example, GPU but also VRM temperature as well as how heat is distributed throughout a product. We do hope you will enjoy this new technology as it did cost us an arm and a leg to be able to implement it.
We can measure pretty accurate temperatures at the GPUs and VRM areas. So once we start to stress the GPU the thermals quickly change. We can measure thermals down to a 10th of a degree, our thermal camera was calibrated in 2016.
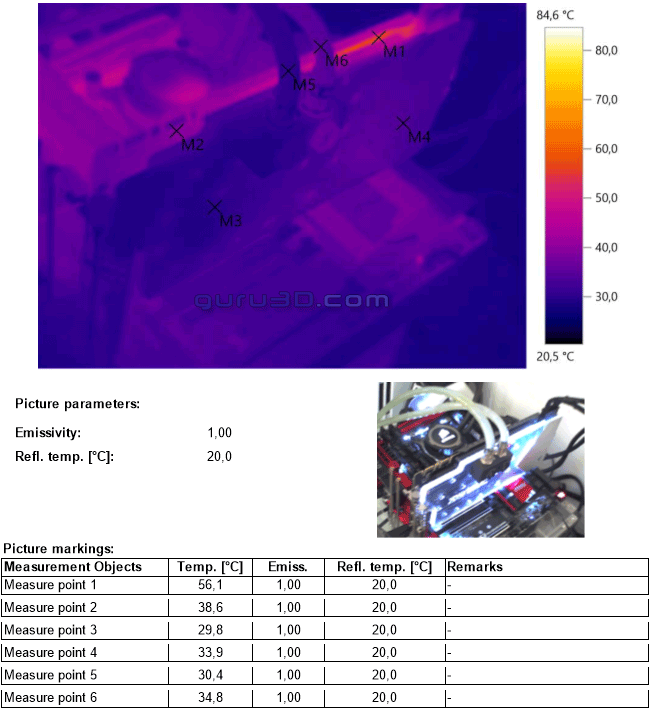
Right, not a lot is lighting up, tha full-cover water block is doing its job alright.
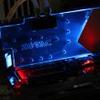
- We reach 52 degrees C on M1, the GPU marker at the back-plate, which is spot on with what the thermal sensor reports back.
- At M3 (Measure Point 3) the PCB area / backplate temp can be measured it runs just close to 50 Degrees C on that spot, that is considered to be a very normal temperature. Make sure you have plenty airflow inside your chassis as that will always help.
- At M2 we are close on the VRM area, at ~54 Degrees C. That's OK but a notch higher then I had hoped for.
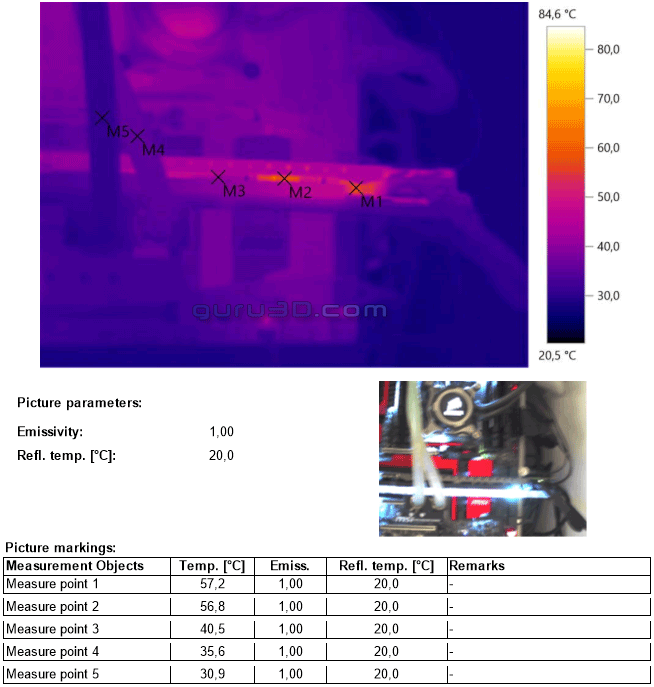
The thermal image clearly shows that nothing is trapping heat. We've seen closed back-plate designs on the founder edition cards, and such ones are not our favorites, we like to see lots of gaps to vent. So this is good.
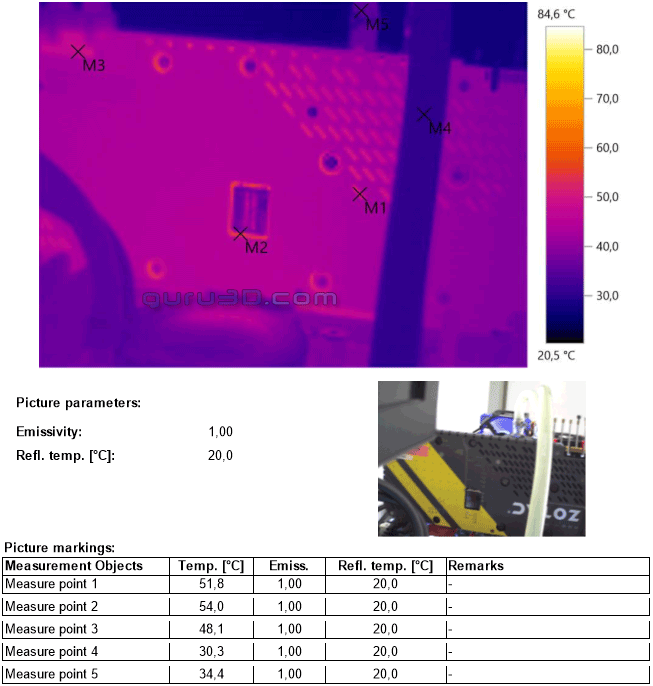
When we position the thermal camera outwards we can see that the overall cooler design really works well. The hottest point is the top side of the card where there is some residual heat detected. M1 is the hottest spot at 56 Degrees C, the VRM area. Remember, this is the graphics card 100% stressed in a FireStrike scene 1 loop.
As you can see at M5 we have coolant intake at 30 degrees C, the coolant output at M6 definitely is warmer at 35 Degrees C, that block is doing its job alright.
A minuscule amount of heat is exhausted at the top side at the M1/M2 position, again the VRM area. Overall if you do not see anything brighjt and colored, it's all good. And it certainly is here.
