VC3600 installation
Installation
For those that are afraid of the installation. If it is the first time that you are going to change a cooler, you should know a few tips before hand. Firstly, ground your self by touching an unpainted metal part of your PC case, with the PC off, but still connected to the mains. Then, you will need to take the card out and take off the cooler of the card. My experience only covers the reference cooler of the GeForce 6800GT though, sorry. For the nVIDIA 6800 reference cooler, you will first need to take off the heatsink cover that usually has all sorts of designs and fancy graphics. This is done by removing some small screws that are around it. Then, unscrew the fan assembly, located on the left of the card. Now flip the card the other side, and start unscrewing the spring screws that hold the RAM heatsink in place. Unscrew just a little bit of each screw at a time, not the whole screw at once, otherwise, the heatsink could apply pressure unevenly. Don't worry about the RAM heatsink though. At least mine didn't apply much pressure. Now, for the GPU heatsink. That is secured by using 4 spring screws. Just as before, just a bit of each screw, untill all four of them are out. Then, for the love of what is holly, don't pull or yank the heatsink out. (And that goes for every kind of heatsink) but instead try to turn it clock wise and anti clock wise to loosen the paste a bit and then take it off. In case the heatsink doesn't come off, it is probably just stuck on the wax like thermal pad. Just use a hair blowdrier to warm the heatsink and so make the paste loose.
Right. Well, the installation of the VC3600 went easier than the one of the VC2600. Like with its little brother, you use a specific set of drilled holes on the base depending on which card you have. Then you use the four supplied rubber insulation cushions.
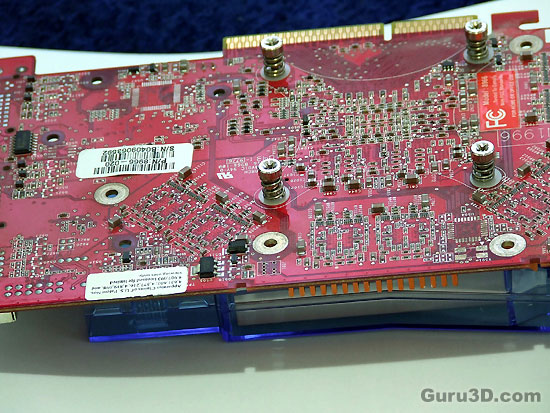
 Screw the four screws on the back of the heatsink and then on top, put the rubber insulators.
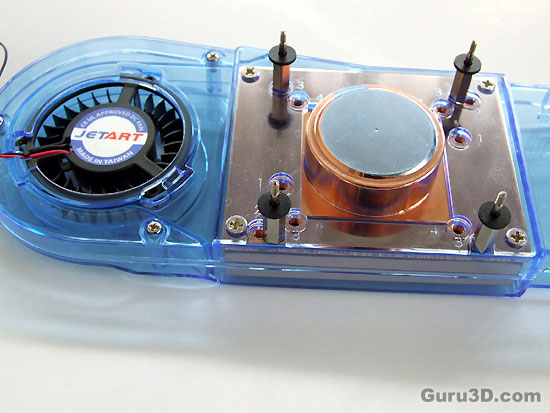
After that, remove the plastic protector on the base of the heatsink, and then apply some thermal paste on the GPU (Supplied with the heatsink if you dont have your own.) Then after putting the card on the heatsink and aligning the screws with the holes, put the four plastic insulators (not the rubber ones, the transparent plastic ones) on the card and use the four spring screws to finish mounting the heatsink on the card.
This is what you should have after you have finished mounting the heatsink. Four spring screws and four washers.
And now lets put it in the case and see another part of it's smart design. Remember the removable vent?
The vent is fully adjustable to suit the card that is being used. It can slide towards and away from the main cooler part and it can also slide up or down depending on how high or low the cooler is mounted.
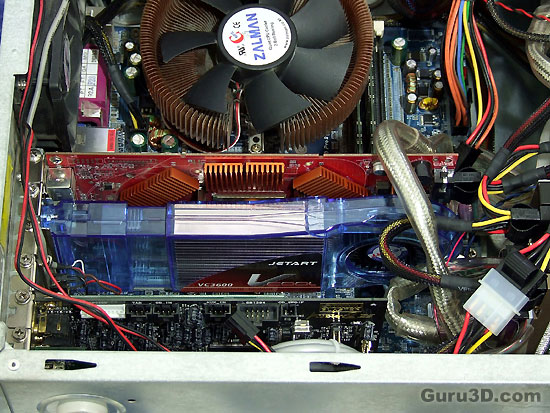
That Dust Buster again!
Because of the nature and length of the cooler though, there was a slight problem, that is not the coolers fault, and is also a bit of common since the nVSilencer5 (rev2) has the same issue. You know the extra heatsink a GeForce6800 has? The one on it end. Mine is held in place by two spring clips that go above the height of the heatsink itself. The cooler touches those and applies a bit of force on them. No problem really, as there is no problem with it. It could scare some that havent tried it before, and make them think that they have done something wrong. Dont worry, as it really is no issue as far as I know.

Health Department notice: Touching and applying some pressure on the spring loaded clips, is fine.
One slight complain if you like, is that unlike its little brother, the VC3600 has no RPM readout. Not a big issue, I dont really care about it, its just that if someone connects it on the motherboard it could be checked out with monitor software to see if the cooler is working ok. Of course, you can simply just look into the case and check manually, but via software would be easier.
