
Working with CTR
Working with CTR
At the end of the tuning, in addition to the main result in the log.

The user can see the results relative to the factory boost on the BENCHMARK page.
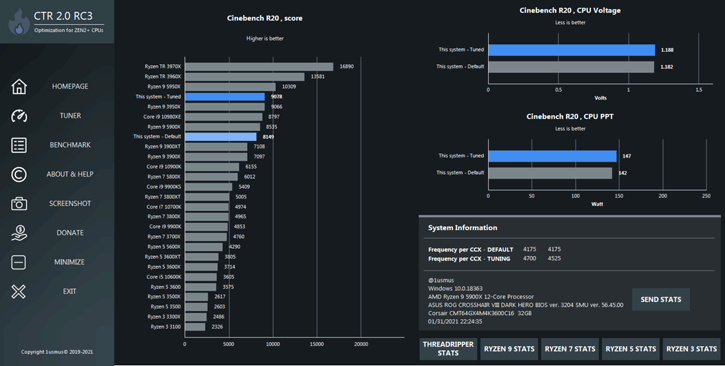
The user will also have the opportunity to send their results to the public google table by clicking on the button SEND STATS. There are several other buttons below this button, which will open the corresponding google table with statistics. Regarding the results, we can see a significant increase in all-core frequency, from 4175/4175 to 4700/4525MHz, while the result in Cinebench R20 increased from 8149 to 9078 (+11%) with the same power consumption. My Ryzen 9 5900X managed to beat last year's flagship Ryzen 9 3950X, which has 8 more threads.
Our next action is to save the obtained profile. To do that, we press PROFILE MANAGEMENT button. There are 2 slots in front of us to store profiles. To transfer all tuning settings into the profile, press FILL P1 PROFILE and then press SAVE P1 PROFILE.
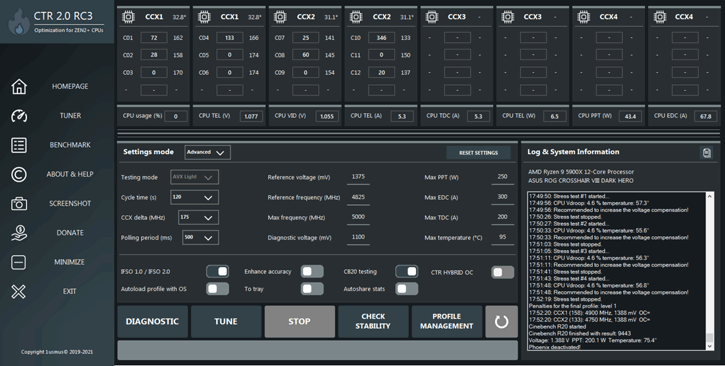
Now we have a saved profile, but for full functionality of the CTR HYBRID OC, we also need P2 profile, the so-called "game" profile. To do this, we enter the recommended starting values from the diagnostics and press the TUNE button again.

I decided to make the P2 profile more superior since both the ASUS ROG Crosshair VIII Dark Hero and the cooling system allow to achieve much more. For that, I set Max PPT 250, Max EDC 300, Max TDC 300 so that CTR doesn't worry about VRM. I set Max temperature to 95, which is the standard CPU maximum temperature. The reference voltage is 1375mV (remind I use LLC Auto, and I don't have to worry about overclocking to damage the CPU). The reference frequency is 4825 MHz. I did not get this value from my head. To calculate it, I used a rule: if the voltage is between 1150-1275mV, then for every 12mV step, the frequency goes up by 25MHz (relative to the frequency value obtained during diagnostics), and if the voltage is between 1275mV - 1425mV, then for every 25mV step the frequency goes up by only 25MHz.
Example: For the P2 profile, the initial frequency is 4675MHz at 1275mV. So you get (1375 - 1275) / 25 = 4 steps of 25 MHz. So you can safely add 100-125 MHz to the starting 4675 MHz.
As a result, I created a profile with the final frequency of 4900MHz for CCD#1 and 4750MHz for CCD#2.
The Cinebench R20 result was an impressive 9443 (+15.8%), and the 3DMARK TimeSpy CPU passed the 16000 mark (+28% relative to full stock)!. It should be noted that 3DMARK TimeSpy CPU is greatly influenced by RAM overclocking.
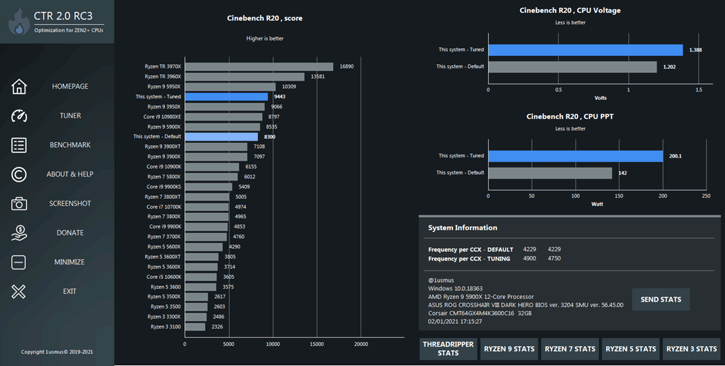
Despite such a solid PPT, the VRM of ASUS ROG Crosshair VIII Dark Hero remained cool, as such a load for it turned out to be a trifle.
