Starting an overclock and tweaking
GPU Boost 2.0
So as you guys known and have learned with the series 600 product, NVIDIA GPU Boost technology automatically increases the GPU’s clock frequency in order to improve performance. GPU Boost works in the background, dynamically adjusting the GPU’s graphics clock speed based on certain conditions. Originally launched last year with the GeForce GTX 680, the first iteration of GPU Boost was designed to reach the highest possible clock speed while remaining within a predefined power target. In essence, the GPU would boost to the maximum clock speed it could achieve while remaining under a certain power level.
Example: for the GTX 680 that power level was 170 watts. Nvidia now thinks that GPU power is unnecessarily limiting performance when GPU temperatures is low. Therefore with Boost 2.0, they’ve switched from boosting based on a GPU power target, to a GPU temperature target. This new temperature target is 80 degrees Celsius for GeForce GTX Titan and likely upcoming future product.
As a result of this change, the GeForce GTX Titan GPU will automatically boost to the highest clock frequency it can achieve as long as the GPU temperature remains at or below 80C. The GPU constantly monitors GPU temperature, adjusting the GPU’s clock and its voltage on-the-fly to maintain this temperature. GPU Boost 2.0 can also deliver a better acoustic profile since temperature is controlled to a tighter range around the user target. This in turn helps keep the fan speed stable and reduces the overall system level noise.
In addition to switching from a power-based boost target to a temperature-based target, Nvidia is now also providing end users with more controls for tweaking GPU Boost behavior. Using software tools provided by Nvidia add-in card partners like MSI and EVGA allow Titan users to adjust the GPU temperature target precisely to their preference. If a user wants his GeForce GTX Titan board to boost to higher clocks for example, he can simply adjust the temperature target higher (for example from 80C, to 85C). The GPU will then boost to higher clock speeds until it reaches the new temperature target.
Due to the change in the way GPU Boost 2.0 functions, the power target setting no longer sets the typical board power (170W in the aforementioned GTX 680 example) instead it sets the board’s max power. At the default power target setting of 100%, the max power setting is 250W. At the max slider setting of 106%, max board power is 265W. That typical board power will actually vary a little based on the ambient temperature. GPU Boost 2.0 will also ensure better performance from water cooled solutions. Water cooling will typically keep the GPU temperature well below the target which will result in higher voltages and clocks.
We just discussed the new temperature target function and how it operates; another new option provided in GPU Boost 2.0 is overvoltage control. Because Titan’s boost clock and voltage level is now tied to the GPU’s temperature, Nvidia now allows the GPU voltage to go higher, this helps to ensure higher clocks, or lower once you reach the GPU temperature target.
Default voltages on Titan are limited to a range fully qualified by Nvidia. This voltage range is in place to protect the silicon from long term damage. However, some of our most enthusiastic customers may want to push their GPUs to the limit by raising the maximum voltage further.
GPU Boost 2.0 enables this “overvoltaging” capability, but does require users to acknowledge the risk to their GPU by clicking through a warning (overvoltaging is disabled by default). Each individual card manufacturer may limit the degree of overvoltaging supported by their cards. Support of overvoltaging is optional, and can be disabled in the VBIOS by the card manufacturer. GeForce GTX Titan boards can reach higher clock speeds when the GPU is overvoltaged.
Starting an overclock
When you want to overclock typically you need to verify and stabilize your tested settings. First off let us remind you that we always recommend increments of roughly 25 MHz on core and memory (from the default base clock frequency upwards). In the first stage you overclock your GPU, in the second the memory. Once you get artifacts or a lockup, back down 25 to 50 MHz and typically that is your stable result in it's highest threshold -- under the condition that the room temperature is the same (yes GPU heat and surrounding heat have an influence on your overclock).
Related to heat is your graphics card cooling system. If you are willing to allow more noise, increase the fan RPM on the GPU towards a higher setting that you find comfortable. Cooling helps with overclocking, it's as simple as that. That backside of your graphics card however gets hot as well, give it some airflow too. So make sure your PC casing is well ventilated with decent airflow.
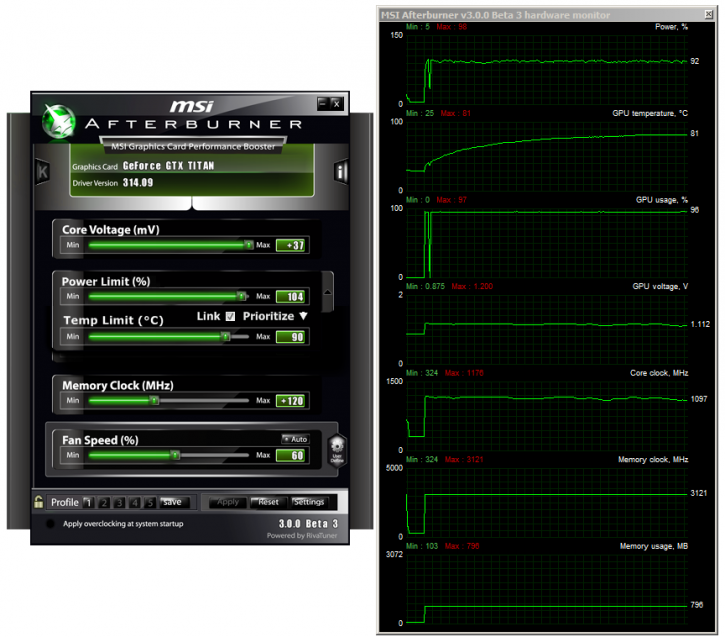
AfterBurner 3.0.0 (to be released) comes with GPU and memory tuning, overvolting, allowing control and adjustment parameters for overclocking.
| Original | This sample | Overclocked |
| Core Clock: 836MHz | Core Clock: 836MHz | Core Clock: 1001MHz |
| Boost Clock: 876MHz | Boost Clock: 876MHz | Boost Clock: 1100~1176MHz |
| Memory Clock: 6008 MHz | Memory Clock: 6008 MHz | Memory Clock: 6242MHz |
Now then, overclocking did get more complicated as increasing the GPU temp has an effect on voltage and thus power consumption which effects the maximum allowed board power and so on. So really it is a matter of trial and error and finding your preferred or maximum balance in terms of extra performance versus noise levels.
We found a very sweet tweak that will bring your boost frequency towards 1100~1176 stable, it will fluctuate depending on power draw / limits.Ffeel free to try our settings yourself. We applied:
- Power Target 104%
- Priority is set at Temperature target and not Power Target
- Temperature Target 90 Degrees C
- CPU clock +165 MHz
- Memory clock +120 MHz
- Voltage 1200 Mv
- Fan control RPM fixed at 60% (a little more noisy but doable).
