The Wireless Media Router 300N
Installation and configuration
So when we swapped out the Media Router 300N with our office router, we literally switched the one WAN and LAN cable to the Sitecom router, we powered it up. Then at the office PC after 15 seconds we already had internet without even configuring a thing. That's just really great.
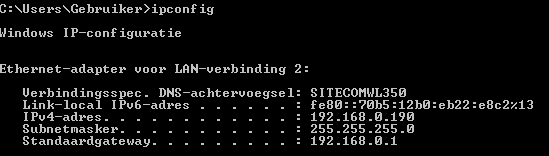
The first thing I always do is look at the ipconfig values to see if we have gotten a DHCP lease (if we got an IP assigned) on one of the clients (PCs). Great the device setup full LAN and WAN for us already.
We do need to configure at least a couple of things though, the first thing one should configure in a router is (when possible) disable outside access, thus access to the router from the WAN side. This will prevent hackers accessing your router. Most routers have this setup as default though. Secondly we want to change the default login username and password. Let's do that, but first we'll need a way to access the router.
This is simple, the Router is configured as DHCP device so it will assign IP addresses in your LAN area at 192.168.0.xxx.
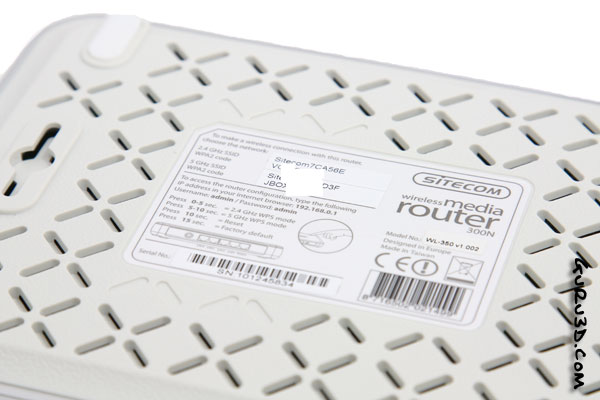
All we need to do is to open up a browser and type: http://192.168.0.1 that's where your router will be located. In the browser screen you'll now be asked a username and password, enter admin:admin (hence why we need to change it to make it more safe).
If you are in a wireless environment, search for wireless connections, and you'll find a network ID corresponding with an SSID you can read out at the bottom side of the router on a sticker. The wireless password is supplied there as well.
Once you have accessed the router succesfully, change the user name and change your wireless password as well.
The 300N router is very configurable and works really fast. For the wireless segment we recommend you use a strong protection and preferably bind the devices that may access your network on the MAC address.
