Page 4
These are tarred and set alight on request, letting out screams and squeals as they run through the battle uncontrollably setting alight to infantry and scaring elephants into bolting and turning on their masters and theres nothing like a nice bacon sandwich after a hard fought battle! In the midst of battle a full range of tactics are at your disposal, depending on terrain and other considerations of the battlefield. If you are under-siege, it can be better to hang back, using your archers to hail death upon the advancing army, whittling down their numbers while you ready your cavalry to flank them from the sides. If you are on the other side of the ramparts, then a full compliment of siege equipment can be at your disposal.
 Seige Tower. 'Arrows hail down, as a seige tower lumbers towards the walls'
Siege towers are huge lumbering structures, while ladders are lighter and quicker. Battering rams are the simplest of equipment and can easily be defeated, while sap points are guaranteed to bring the enemies walls crashing down around them. Once over the walls, new dangers await. If you smash down the gates, burning oil is constantly tipped upon your advancing army as they rush through the gates, unsettling them and even causing units to rout. Once on the ramparts infantry have to fight their way to the gateways, while cavalry may be waiting to charge you as you enter through broken walls.
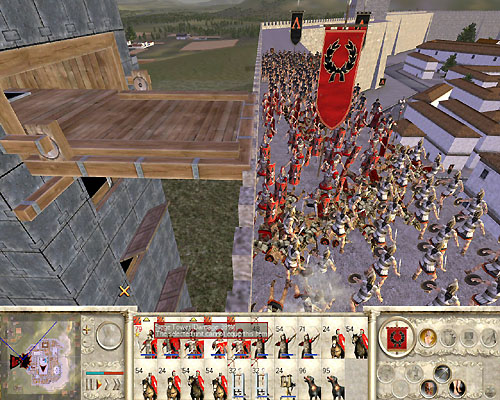
Over the Wall! The fight has just begun - once over the ramparts, your troops have to fight through enemy ranks.
The depth of strategic involvement in these battles really encourages you to learn the best uses for each of your units, as numbers dont necessarily guarantee victory. This works both ways, as with correct planning you can crush an army double in size, but you would be a fool to be complacent about a smaller army as the same can be true for them. What units you have in your army is also key. If you are forced into a battle with largely infantry at your disposal, against a consolidated force of cavalry then an early grave awaits. A well balanced force is important in advancing your aims. The morale of your troops is important too. If your enemy should take the head of your General, you may well find your troops turn and run, so it is best for him to hang back except in times of emergency or when victory is guaranteed. If your men bring down the enemy general however, your army will attack with renewed vigour while the enemy cowers in the face of certain defeat. The interface is generally easy to use. Your units are listed as cards along the bar at the bottom of the screen, along with the radar to your left. Each card displays how many soldiers comprise the unit, if they are under fire, whether they are routing and if they are operating siege equipment or not. Clicking on a unit will select it, while double clicking will take you to it, and display formations and/or special features that unit has on the buttons to the right. To command a unit to move, left click on it to select it, and right click where you want it to move to. Double right click for it to charge but beware, for charging your units too much will cause them to tire and become less effective. You can group selected units so as to move them at once for easier management. The engaging nature and encapsulating power of these battles makes you want to fight every inch of ground for yourself, and takes away any temptation that you might have had to hit the auto-resolve button. In the whole of my campaign on only two occasions did I let the AI work out the conclusion of a battle and even then I disagreed with the outcome so reloaded and fought the battle myself!
