Guru3D.com
  • HOME
  • NEWS
    • Channels
    • Archive
  • DOWNLOADS
    • New Downloads
    • Categories
    • Archive
  • GAME REVIEWS
  • ARTICLES
    • Rig of the Month
    • Join ROTM
    • PC Buyers Guide
    • Guru3D VGA Charts
    • Editorials
    • Dated content
  • HARDWARE REVIEWS
    • Videocards
    • Processors
    • Audio
    • Motherboards
    • Memory and Flash
    • SSD Storage
    • Chassis
    • Media Players
    • Power Supply
    • Laptop and Mobile
    • Smartphone
    • Networking
    • Keyboard Mouse
    • Cooling
    • Search articles
    • Knowledgebase
    • More Categories
  • FORUMS
  • NEWSLETTER
  • CONTACT

New Reviews
be quiet Pure Loop 2 FX 280mm LCS review
HP FX900 1 TB NVMe Review
Scythe FUMA2 Rev.B CPU Cooler review
SK Hynix Platinum P41 2TB M.2 NVMe SSD Review
Corsair K70 RGB PRO Mini Wireless review
MSI MPG A1000G - 1000W PSU Review
Goodram IRDM PRO M.2 SSD 2 TB NVMe SSD Review
Samsung T7 Shield Portable 1TB USB SSD review
DeepCool LS720 (LCS) review
Fractal Design Pop Air RGB Black TG review

New Downloads
Display Driver Uninstaller Download version 18.0.5.4
FurMark Download v1.31
Intel HD graphics Driver Download Version: 31.0.101.3222
Intel ARC graphics Driver Download Version: 30.0.101.1743
AMD Radeon Software Adrenalin 22.7.1 driver download
GeForce 516.93 WHQL Studio driver download
Corsair Utility Engine Download (iCUE) Download v4.26.110
ReShade download v5.3.0
AIDA64 Download Version 6.75
7-Zip v22.01 Download


New Forum Topics
760 GTX Need Attention-Scrap Enable Resize Bar by yourself in every game Razer released gaming chairs inspired by Williams and Koenigsegg (at 1299 USD) Why does NVIDIA handle multitasking during compute better than AMD? GeForce 516.93 WHQL Studio driver download New DLSS DLL 2.3.9 shows little to no ghosting?! RDNA2 RX6000 Series Owners Thread, Tests, Mods, BIOS & Tweaks ! NVIDIA GeForce Hotfix Driver Version 516.79 At Least One AIB Halts Production ARC Graphics cards - Is ARC Doomed? AMD presents premium X670E motherboards from ASUS, MSI, ASRock, Gigabyte and Biostar


Guru3D.com » Review » RivaTuner 2.0 fan speed & Overclock Guide » Page 1

RivaTuner 2.0 fan speed & Overclock Guide - RivaTuner 2.0 - Creating Fan Profiles

by Hilbert Hagedoorn on: 08/05/2007 02:00 PM [ ] 0 comment(s)

Tweet


Author: Derek Wood

A lot of people tend to ask on how to set fan speeds or overclock their graphic cards. This guide will hopefully help you understand how to use the features that Rivatuner provides.

This tutorial/guide will be using the following graphics card and driver (NVIDIA):

  • eVGA 8800 GTS
  • ForceWare 158.19

Sections:

  • Creating Fan Profiles
  • Creating Launcher Items
  • Configuring Automatic Fan Control
  • Creating Overclocking Profiles

Rivatuner main content:

  • Rivatuner homepage
  • Download RivaTuner

Creating Fan Profiles

Let’s start by configuring fan speeds and controlling them using RivaTuner.

If you are using a NVidia driver higher than 100.XX you will probably need to configure a Power User setting. (Although recent driver releases: 158.XX and higher have been detected by Rivatuner as 58.XX and work)

Go ahead and start by opening up RivaTuner. Click on the arrow box next to Customize… next to the second text box on the application. Then proceed to click the icon that represents a graphics card.

Rivatuner Guide- Guru3D.com 2007


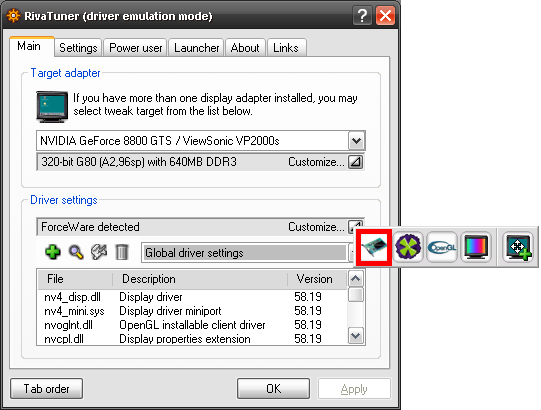
A window will then open up where you can control the fan speed of your graphics card. Go ahead and click the checkbox next to “Enable low-level fan control.” If you are prompted for a “Reboot” or “Detect Now”, click “Detect Now”.
Now, we’re going to create a fan profile. Go ahead and click on the radio button called “Fixed”. You can now drag the arrow on the bar to the desired speed. For this tutorial I will be using 60%, 80%, and 100% fan speeds. You can make as many or as few as you want.
Go ahead and drag the bar to 60% and click Apply (60% may already be set as it may be the default speed). This will then set your current fan speed to 60%.

Rivatuner Guide- Guru3D.com 2007

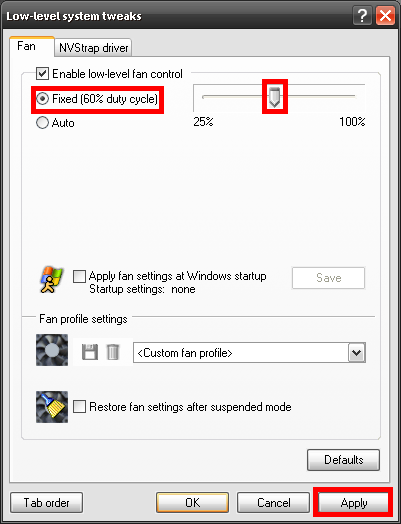
Next, we are going to save that fan speed to a profile, so it can be accessed later. After you clicked the “Apply” button, the diskette looking icon should now be enabled.

Rivatuner Guide- Guru3D.com 2007

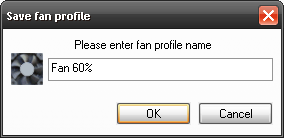
Go ahead and click the Save Icon (diskette picture). This will prompt you with the name to enter for the fan profile. Type in what you wish. For this tutorial, I’m using “Fan 60%”, “Fan 80%”, and “Fan 100%”.

Rivatuner Guide- Guru3D.com 2007

After you have saved the profile. Go ahead and repeat this two more times for 80% fan speed and 100% fan speed.
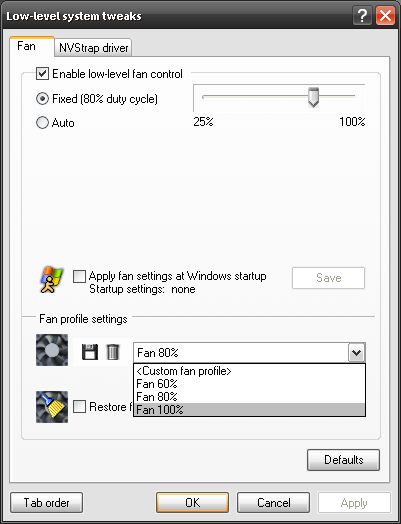
Rivatuner Guide- Guru3D.com 2007

You should now have 3 fan profiles: “Fan 60%”, “Fan 80%”, and “Fan 100%”
Now, we will proceed to the next step.


5 pages 1 2 3 4 5


Related Articles
RivaTuner 2.0 fan speed & Overclock Guide
A lot of people tend to ask on how to set fan speeds or overclock their graphic cards. This guide will hopefully help you understand how to use the features that Rivatuner provides.

© 2022