6 - Installation, BIOS and overclocking
Installation
What Gigabyte does well is creating a user-friendly experience. Installation for example is a breeze., You boot into Windows, pop in a driver-cd and then the software on it will execute Express install. I'll lookup your hardware and offer you to automatically install all software and drivers needed. Once finished, the system restarted a couple of times ... you are good to go. Well in theory that is ... of course on an existing Windows Vista build on the HD (we ghost all images) the software decided to hang & crash. So we had to install the drivers manually. On a second try with a fresh install of Vista .. the feature worked fine. Overall the implementations looks & feels good though.
BIOS options
The Gigabyte BIOS comes with a plethora features and overclocking options. What I extremely like are the fail-safe features. For example the quad BIOS functionality, but also if you need to flash the BIOS. You can do this from within the BIOS itself with QFlash. In the BIOS you enter that function, you can select the BIOS you download from the HDD, or USB Stick... and then rewrite the EPROM. Great stuff. Anyway, obviously there's also a plethora over overclocking features.
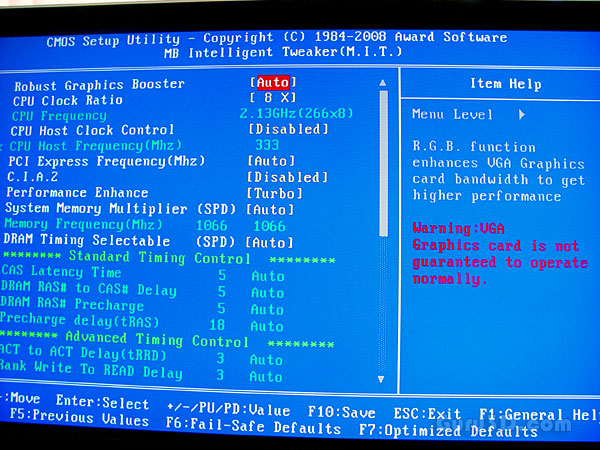
First things you want to do is disable the power saving features though, as they will hinder your overclocking results.
- FSB Settings: 100MHz to 700MHz
- DDR2 Settings: Auto, 2.0, 2.4, 2.5, 2.66, 3.0, 3.2, 3.33, 4.0 (FSB Strap Dependent)
- PCIe Settings: 90MHz to 150MHz
- CPU Voltage Settings: 0.51250V to 1.60000V (in 0.00625V steps), 1.60V to 2.35 (in 0.05V steps)
- Memory Voltage Settings: +0.05V to +1.55V (in 0.05V steps)
- PCIe Voltage Settings: +0.05V to +0.75V (in 0.05V steps)
- MCH Voltage Settings: +0.025V to +0.375V (in 0.025V steps)
- FSB Voltage Settings: +0.05V to +0.35V (in 0.05V steps)
- Multiplier Selection: Yes (unlocked CPUs only)
The BIOS however will give you the ability to control anything. Including a very wide range of frequencies, multipliers, and voltages, so users would have no trouble to adjust settings manually. FSB settings of up to 700MHz means a reachable FSB of 2800 MHz ! That's plenty of headroom on the board for overclocking the CPU, memory and PCI Express bus frequencies if they can handle it. The range of voltages is also large allowing the end-user to change the voltage settings with ease.
Overclocking & Tweaking
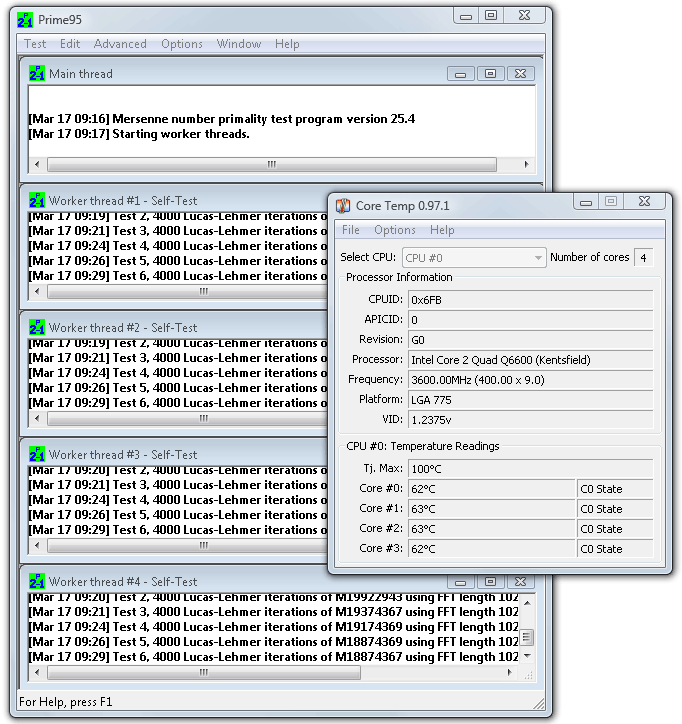
Our overclocking results where reasonably okay. Typically with the processor used on the stock Intel air cooler we can reach 3.5 / 3.6 GHz on our Q6600 processor. What you need to do:
- First things first, in the BIOS you'll want to disable everything CE1 and SpeedStep related.
- Set your memory at safe timings and a mellow frequency, increase the FSB until you reach the maximum, lower the multiplier if possible. And so on.
Usually you guys end at 3 GHz 3.0-3.2 GHz on a Core 2 Quad Q6600 quad-core, right? I put the FSB to 1600 MHz, the multiplier to 9 and then did nothing, the system refused to post. And automated series of restarts will set the mainboard back to default settings. This is the difference with a nForce 780/790 mainboard which has predefined OC configurations.
After raising the core voltage of the processor too a way too high 1,65v we finally reached a stable POST. Obviously we made sure the FAN was set to maximum which made it sound like a JSF fighter on a runway takeoff.
Check temps, overclock speeds and Prime95. We measured and overclocked at a 20 Degrees C ambient room temperature.
Inevitable the temps rose to beyond 75 degrees ... not acceptable. We'll need better cooling. Point here is that the mainboard can manage the FSB, which is all we wanted to proof, yet requires a higher CPU voltage compared to other high-end specced mainboards we tested.