
Overclocking the graphics card
Overclocking the graphics card
As most of you know, with most video cards you can apply a simple series of tricks to boost the overall performance a little. You can do this at two levels, namely tweaking by enabling registry or BIOS hacks, or very simply to tamper with Image Quality. And then there is overclocking, which will give you the best possible results by far.
What do we need?One of the best tools for overclocking NVIDIA and ATI videocards is our own AfterBurner which will work with 90% of the graphics cards out there. We can really recommend it, download here.
Where should we go?
Overclocking: By increasing the frequency of the videocard's memory and GPU, we can make the videocard increase its calculation clock cycles per second. It sounds hard, but it really can be done in less than a few minutes. I always tend to recommend to novice users and beginners, to not increase the frequency any higher than 5% on the core and memory clock. Example: If your card runs at 600 MHz (which is pretty common these days) then I suggest that you don't increase the frequency any higher than 30 to 50 MHz.
More advanced users push the frequency often way higher. Usually when your 3D graphics start to show artifacts such as white dots ("snow"), you should back down 10-15 MHz and leave it at that. Usually when you are overclocking too hard, it'll start to show artifacts, empty polygons or it will even freeze. Carefully find that limit and then back down at least 20 MHz from the moment you notice an artifact. Look carefully and observe well. I really wouldn't know why you need to overclock today's tested card anyway, but we'll still show it.
All in all... do it at your own risk.
| Original | This sample | Overclocked |
| Core Clock: 915 MHz | Core Core Clock: 967 MHz | Core Clock: +75 MHz |
| Boost Clock: 980 MHz | Boost Clock: 1046 MHz | Boost Clock: ~1200 MHz |
| Memory Clock: 6008 MHz | Memory Clock: 6210 MHz | Memory Clock: 7192 MHz |
Now with the Dynamic boost function of the series 600 cards overclocking is definitely more complicated to work with. It remains simple enough though if you know what and how to do it.
In PrecisionX we widen up the TDP limitations a bit, set the power limiter towards 122%. That way the Dynamic boost function won't down clock all the time to meet it's upper threshold in TDP limitations.
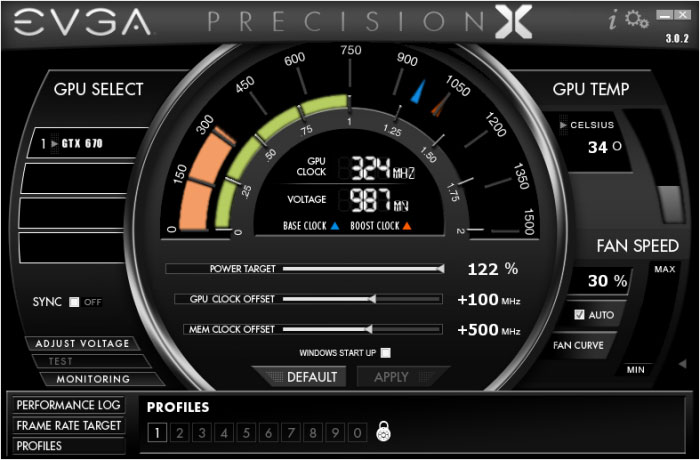
We now add another 75MHz towards the graphics core (that was the maximum stable on the of the factory-overclock). The dynamic clock will still kick as well with the power limier now loosened up, as such we noticed roughly 1200 MHz (which varies based on power draw/load/changes).
For the memory we ended at 7192 MHz (effective data rate). At this stage the cooler RPM was set at 65% as such the noise level now has risen towards roughly ~44 DBa which can be considered to be noisy. We now have some extra performance at our hands, have a peek at the results when overclocked.
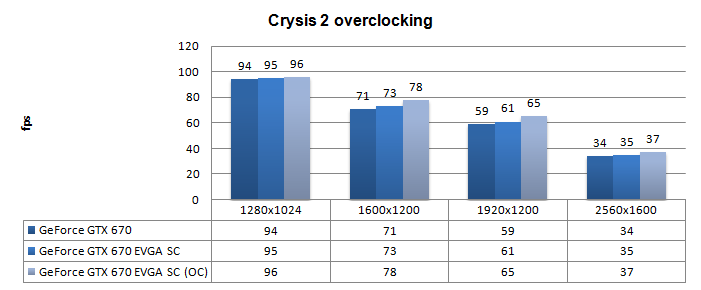
Above, Crysis 2, same maxed out image quality settings as before yet now with added overclock results:
- DirectX 11
- High Resolution Texture Pack
- Ultra Quality settings
- 4x AA
- Level - Times Square (2 minute custom time demo)
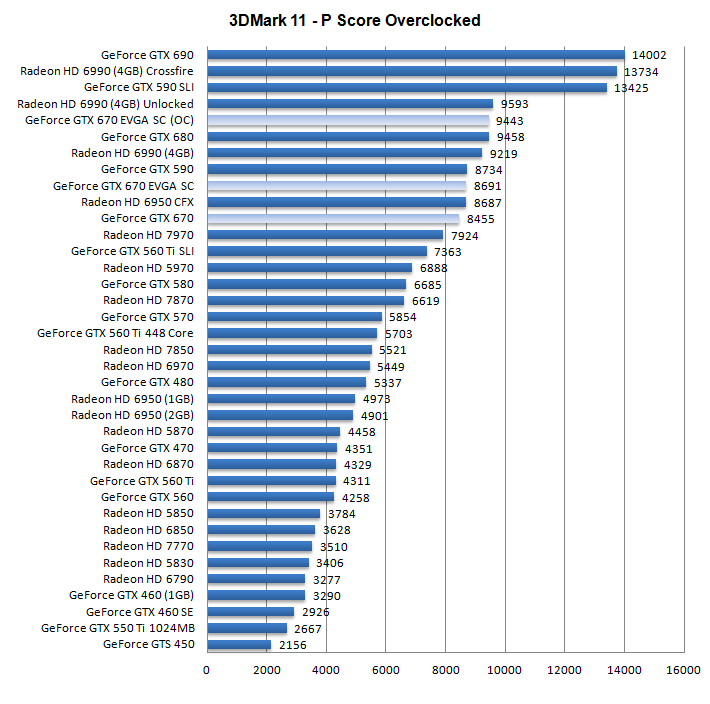
Above, 3DMark 11 - the Performance test and score. As you can see, there is an additional bump in this very GPU limited software, lovely.
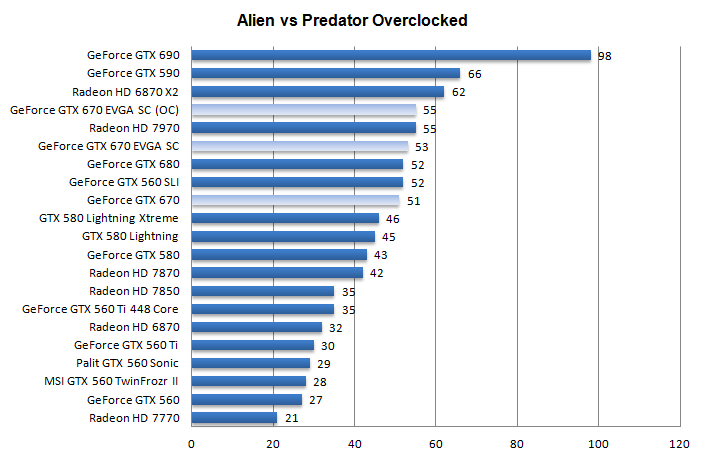
Above, Alien versus Predator, in 1920x1200 at 4xAA and 16X anisotropic filtering
