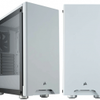
Product Showcase - The build
Below are a list of components that were used in the build process:
- Motherboard - MSI B350M Mortar Arctic
- PSU - Corsair TX650M
- Cooler - Noctua NH-U12S
- GPU - XFX Radeon RX 480, GTR Black Edition
- System Fans - 3x Corsair ML120 w. RGB controller
.jpg)
Time to build. For a chassis that - in my mind - bridges the gap between the ultra-compact and more regular sized units, there is more than enough space to work with here.
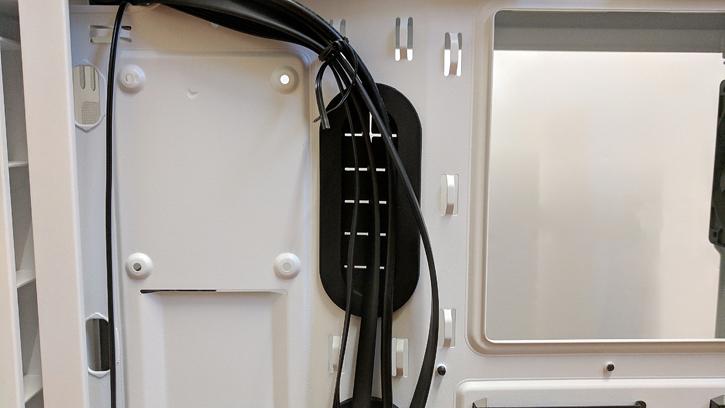
No velcro ties here, but it is nice to see grommet rubberized holes for all cable routing.
.jpg)
Despite the reduced length when measured up against the original case, my 650W unit (as PSUs of bigger sizes do seem to be forever getting smaller and squatter*) had zero issues fitting with plenty of space to spare.
.jpg)
Naturally, you'll need to account for cable length protruding from the PSU itself, but that's an extra 2-3cm or so, given that they'll be making a right angle turn fairly fast.
.jpg)
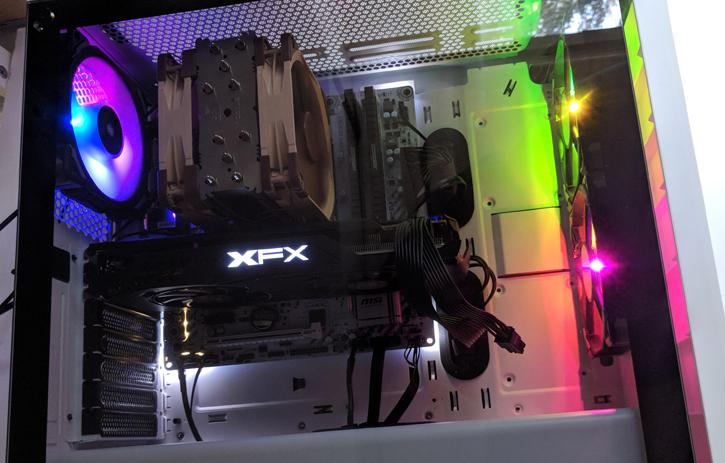
As is expected, the mATX board slots in without an issue, and even looks a little lost in there. There really is acres of room to work with, which should be welcome news for beginners and those of us with bucket-sized hands. Mounting a taller tower cooler also shouldn't be a problem, though maybe double check with units as large as the NH-D15 or Dark Rock Pro 3.
This is a bit of a test for the PC, as I will be using many a cable today. EPS, PCIe, two SATA chains, as well as in case cables and those coming from the ML120's necessary RGB controller and hub. Despite this, I found that there was plenty of space to tuck away cables where needed, and zip tie them also. The case is certainly not lacking in cable management options, and whilst a guide bar or velcro ties would be nice, it's not a big problem.
The build went mostly without issues. The manual, whilst illustrated, is a little light on what diagrams. For a case aimed at beginner builders, a little more instruction could be useful here. With a little thinking, however, it's not a problem. Another small point I'd like to mention is that the HDD activity light is inherently tied to the light show on the bottom of the panel. I found this to be an odd choice, as it means the lighting flickers whenever your drive is doing something. Not really an issue, but something to note.
.jpg)
As before noted, there is more than ample room in the main case area, especially when using an mATX board. Using an ATX board, however, would also be no problem, thanks to the well placed rubber grommet on the PSU shroud. There is also a small cutout on the extreme left hand side of the case, for any thinner HD audio and fan cables down there. There was ample room behind the motherboard tray for wiring, even when using the wide variety of cables that I was. Cable tidying the initial mess was easy, as well. At its thinnest, the same 2cm of space exists behind the mainboard tray, as well. This is more than enough for a thick EPS cable, so no problems there.
Take a look at the completed build photos. The effect isn't so obvious in a still, but the white chassis combined with the RGB show provided by the three ML120's is really quite pretty. I think the finished build looks very good, and the only way it could be improved would be using an ATX mainboard, thereby better hiding the necessary cabling that plugs into the bottom of it.
For 79.99 USD, I really cannot complain about the way this case looks when housing a build. I'd go as far to say as it's probably my favourite mid-tier ATX mid-tower of the moment. It checks all the boxes, for me. Tempered glass, clean/angular lines, and a light show? Sign me up, and I'm not even a big fan of RGB... I appreciate that the fan kit I use isn't cheap, but even some simple white LED fans - in my opinion - would be easily enough to provide a similarly pretty effect.
