Page 3
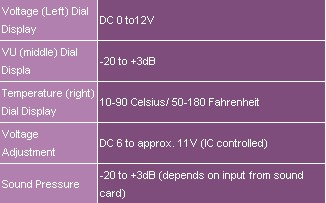
VU Meter
Now this is something Ive never seen in a temperature monitoring device! (Not that Ive seen many of them :p) This indicator measures the sound pressure from the sound card. You connect the Musketeers VU input with a Bracket that comes along, and then you connect the sound card on the bracket's audio in. (The sound cards Line out or Front speakers connector is used for this one.) Then you connect the speakers to the audio out on the bracket. The indicator infront will then swing along in sync with the audio taken from the soundcard. I dont believe that it has any real use in a device of this sort, but it sure adds to the whole looks department and its fun to see it swing back and forth like a Musketeer sword-fighting (pun intended ;-)).
NOTE: The accuracy of the VU meter is debatable I believe. It depends on the way you have it set up. The instruction leaflet that comes with it, advices that users are to set up the VU slider (Right slider) to the MAX setting and then lower the software volume (Its the Mixer volume ;-) ) to a level that the peak pressure does not go out of the red zone. (The meter does not hit MAX above +3dB and stay there until you turn off the sound.)
NOTE No 2: As said above, the VU Meter does not work with digital speakers , S/PDIF to MiniDIN output. And by saying Digital Speakers I mean the speakers that use a digital interface like DIN or the digital interface of Creative. (I have the DTT 2500 that are connected to the digital out of my Audigy through Creatives MiniDIN input on the speakers.) All you are going to hear is static. You must use the 3.5mm analog connection.
HOWEVER: When connected to normal Coaxial cable and then to a Dolby Digital receiver for normal AC3 audio, the signal comes through as it should, however it does not make the needle move (Its digital signal! not analog audio...)
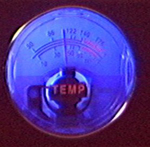 Temperature MeterProvides temperature reading through the Temperature probe, in both Celsius and Fahrenheit readings. You can use it to check the temperature of a device you want. You cannot have multiple temperature readings due to physical restrictions. (Only one temperature indicator) If you want to measure the temp of your CPU, you would need to place the probe as close to the CPUs core as possible, or you could leave it hanging in the middle of your case to measure the ambient temperature of the case, or have it on the Hard Disk to check its temp, or ... (Ok, i think you got the idea.) If you put it near the base of the heatsink and use duct tape (Duct tape RULEZ!) you would be about 2-3 degrees off. If you have AMD, you could put the probe at that gap the CPU makes with the heatsink so that the probe will touch the under side of the sink, just dont use force to push it in if it doesnt go in cause you could make the heatsink to loose contact with the core. You can also put it between the fins of the heatsink near the centre of the sink (That is were i have it and i find it to be just a couple of degrees off on my copper heatsink.)
***Dont forget! Modifying the heatsink in any way (like drilling a hole for the probe) will not only remove any warranty from the heatsink, but might remove warranty from the CPU as well. (Misuse But then again Overclocking removes the warranty of the CPU as well But there isnt anyone here that does that, is there? ;-)) ***