Nvidia G-Sync Setup
Okay, we slowly get to the point where we will install the monitor and drivers. Right now there are some requirements for G-Sync:
- Windows 7/8.1 Desktop PC.
- GeForce GPU – GTX 650 Ti Boost or Higher with DisplayPort Connector (we used a GTX 760 for G-SYNC testing.)
- DisplayPort 1.2 cable (our press sample is DP1.2 compatible.)
- Full-screen mode applications (games must be run in full-screen mode to use G-SYNC.)
- Quality gaming mouse (6400dpi, 1000Hz polling) and/or a quality game controller.
You'll notice that I highlighted a line there, yes games and thus application will need to be run in full screen mode. So windowed G-Sync as it stands will not work. This has to do with the NV control panel being profile based, and these profiles do not work in a windowed mode. For our tests I'll be using a rather normal GeForce GTX 760.
Drivers & Installation
The GeForce driver that can enable NVIDIA G-SYNC is the latest GeForce ForceWare driver (download) available to the public. You simply install the GeForce Graphics driver.
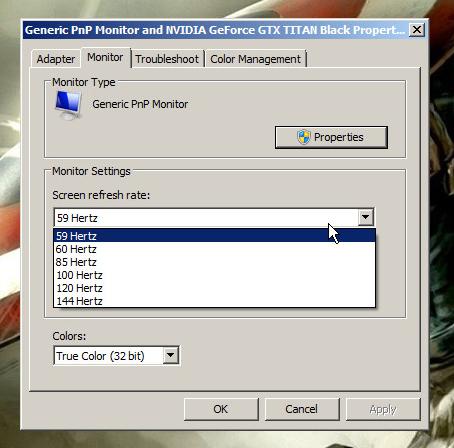
When using NVIDIA G-SYNC with the ASUS monitor you should check a setting or two though. First off, as stated we'll be testing at 144 Hz today with G-SYNC. I understand though that most of you guys have a 1080p 60Hz monitor, G-SYNC technology obvious works pretty darn nice at 60Hz as well. But higher, as so often, is better.
You could argue that after say 35 FPS the eye should not see the difference in between 35 Hz and 100 Hz, but we all know... it does. That thesis doesn't change and as such there also will be a strong demand for fast graphics cards. The one difference is that the output quality you are looking at is much more accurate and getting close to being anomaly free.
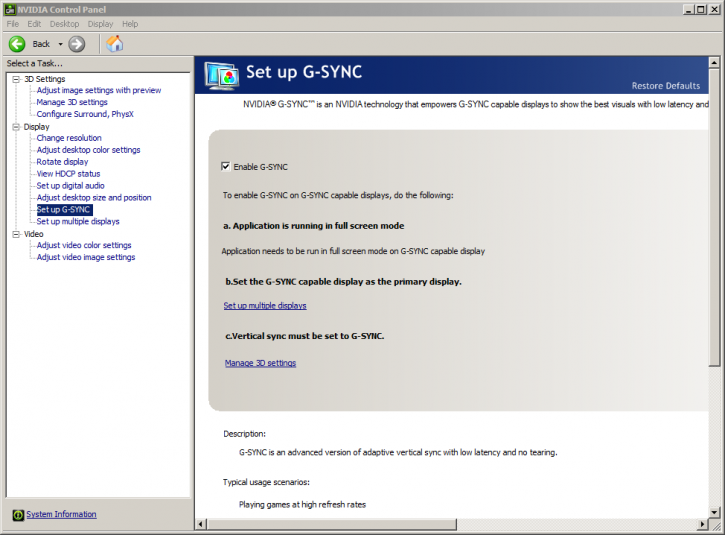
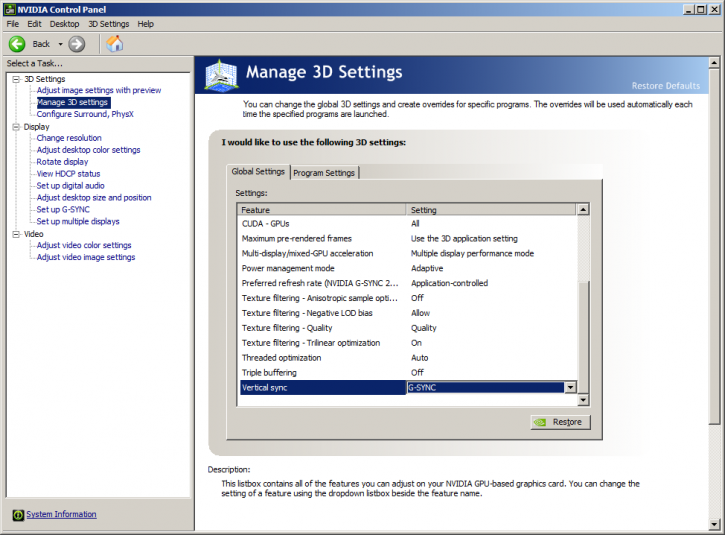
Activate G-SYNC
After you hooked up the monitor and installed the driver, G-Sync should already be configured and active for you. But please do verify it by navigating to the “Manage 3D settings” tab on the left hand side of the NVIDIA Control Panel.
- Select “G-SYNC” at the bottom of the “Global Settings” tab under the “Vertical sync” option.
- Also ensure that “Preferred refresh rate (NVIDIA G-SYNC)” is set to “Application-controlled.”
- To disable G-SYNC, simply set the “Vertical sync” option to “Use the 3D application setting.”
What about game compatibility?
NVIDIA G-SYNC technology is designed to work with all OpenGL and DirectX games on Windows 7 and 8.1. The nice thing here is that G-SYNC simply works. I do need to make one side-note though the technology affects the display pipeline, it can reveal previously unnoticed glitches, stutters, and artifacts caused by the game engine or other PC operations. This can be caused by any number of different factors including texture loading, memory swaps, etc. There are also some cases where the game has specific frame rate limitations that limit the maximum frame rate. I should state that G-SYNC is meant to show the game in the most direct and transparent way possible, what you see is coming directly from the GPU. So if the game has “game engine” issues, G-SYNC will not fix them (and yeah the Metro LL benchmark scene for example still is a stutter fest).
