Overclocking With The Ryzen 7 1700
Overclocking
For overclocking on an 8-core processor, you always need to keep things relatively simple. We need to take a couple of steps if we want to overclock. First tip, always invest in good hardware by the way (MOBO/PSU/Memory/Cooling), the cheaper motherboards often are not well tuned for enthusiast overclocking. Also get yourself a good power supply and proper processor cooling. Overclocking with any 8 or more core processor (doesn't matter if that is Intel or AMD) is far more difficult than you expect it to be.
In this review we use the affordable Ryzen 7 1700 priced at 329 USD. The processor has a 3.0 GHz base clock and can Turbo (binned) to 3.7 GHz.
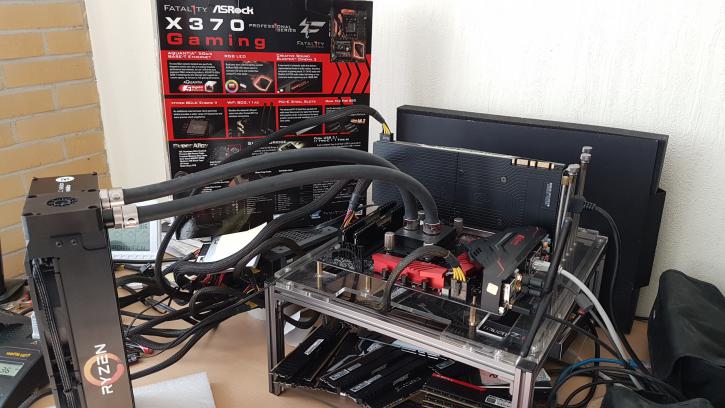
We did a number of heat-pipe based overlclocks in other reviews, hence for this one we are now switching to liquid, LCS cooling. The liquid cooler is a 240 rad based EK Predator kit with Socket AM4 water-block.
Overclocking 8-cores on a high clock frequency is a tough job if you do not know the right variables to work with, but can be managed relatively easily from the BIOS. You can also use AMD's software tool of course. The Ryzen 7 1700 has a base clock of 3.0 GHz and a boost frequency of 3.7 GHz. During our measurements by trial and error we found that at 1.375~1.450 Volts you will end up at roughly ~4.1 GHz (that is on all eight cores!). And yes, that is not a lot over the default Turbo, but again this is 8-cores. We recommend you leave CPU voltage at the bios auto setting.
BIOS Overclocking
The Guru3D reader-base overclocks mostly from the BIOS to try and find the maximum stable limit. The generic overclock procedure for multiplier based overclocking is as follows:
- Leave base clock (bus) for what it is right now (100 MHz)
- Set the per core multiplier at a maximum of your liking:
- Example 1: 100MHz x 41 = 4100 MHz
- Example 2: 125MHz x 33 = 4125 MHz
- Increase CPU voltage; for the motherboard the AUTO does not work well, please select a manual CPU voltage. For a target at 4.0~4.1 Ghz start at 1.375 volts and work your way upwards into a state of equilibrium in perf and cooling temps. We need 1.45 Volts for a stable 4.1 GHz on all eight cores on our particular processor.
- Make sure your processor is properly cooled as adding voltage = more heat
- Save and Exit BIOS / uEFI
Tweaking with the motherboard is a bit more difficult, the steps however are simple.
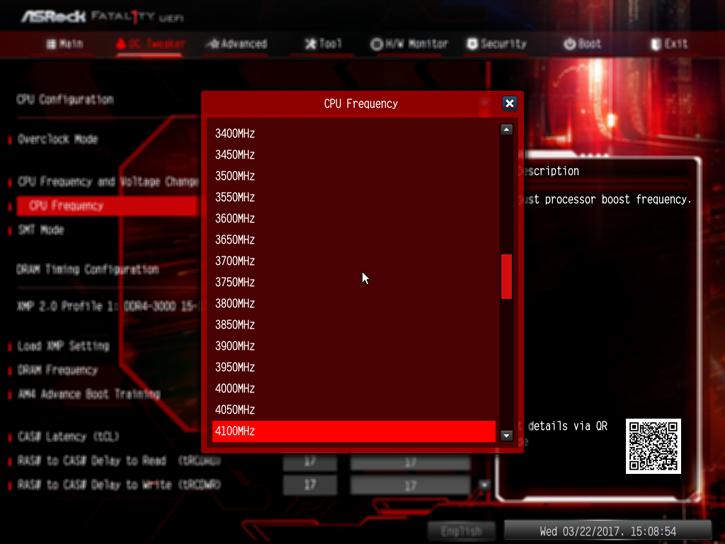
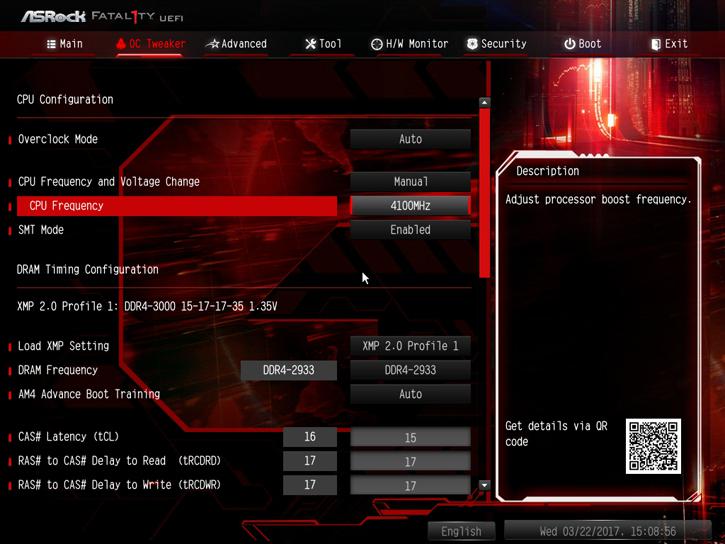
We set the processor to 4100 GHz (all 8-cores), once you pass 3700 MHz this disables XFR automatically. Ryzen processors like memory bandwidth, so with this dual-channel setup we really can recommend higher frequency memory like 2933 / 3200 MHz. ASRock supports the XMP SPD profile of our memory used. If XMP is supported for your memory (and stable) just enable it for the best compatibility.

The one thing we did need to manage and enable manually was CPU Voltage. We need 1.395V for a stable 4.0 GHz and found 1.450V very stable for the 8 cores at 4.1 GHz. That number however might vary a bit per processor batch. Now, have a peek at the screenshot below:
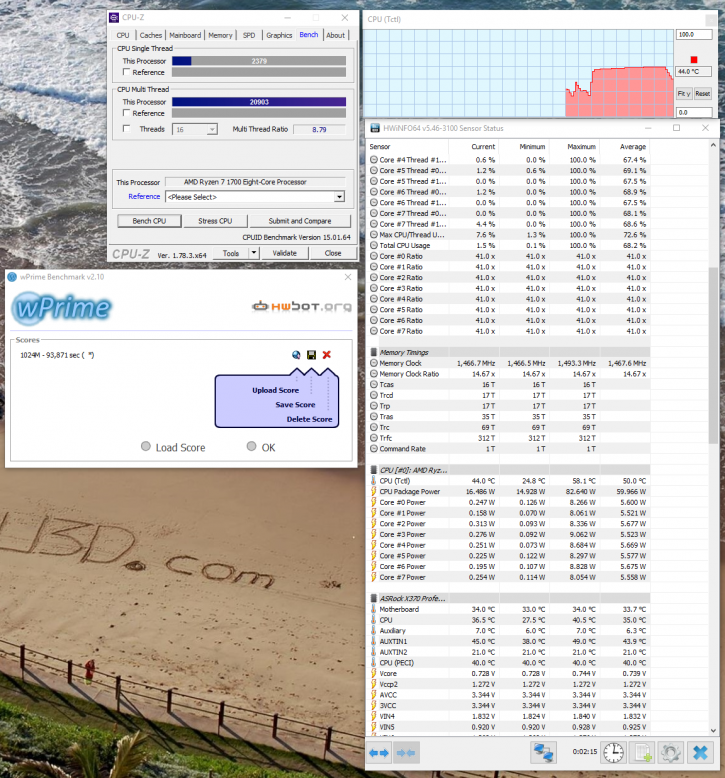
Here is an example at 4100 MHz @ all cores
For this tweak we test the OC EK Predator LCS cooler. We have been able to sustain a stable 4.1 GHz on all cores of this Ryzen 7 1700 processor. Basically 4.0~4.1 GHz on all cores seems to be the sweet spot that I'd like to recommend to you. Overclocking however always varies per system, PC, ASIC quality, cooling and sure - a bit of luck as well.
Did you get stuck at 2133 or 2400 MHz with faster capable memory?
I recommend that in order to get that Ryzen running properly you do the following:
- Clear CMOS, fully power drain the system
- Load optimized defaults, save & exit and reboot (DO NOT CHANGE ANYTHING ELSE at this point).
- Enter BIOS again and apply the recommended, say, 2933 MHz setting (16-18-18-18-36 and 1.35V), save & exit.
We have seen numerous cases where boards can refuse to run properly following a component change, clear CMOS or memory training fail (i.e. too high clock was applied). The “trick” is the step #2. Normally at that point you’d just go and apply the setttings you want to use but for some reason an extra reboot is needed to properly load those defaults.
Example: on AsRock if I try to apply anything higher than 2400 right after clearing CMOS (or right after changing CPU or right after failed memory training) it will always FAIL. The extra step listed above (#2) allows it to run 2933 100% and 3200 with more lucky boards + components. You can find the recommended DDR4 voltage and timings on the sticker if XMP does not kick in.
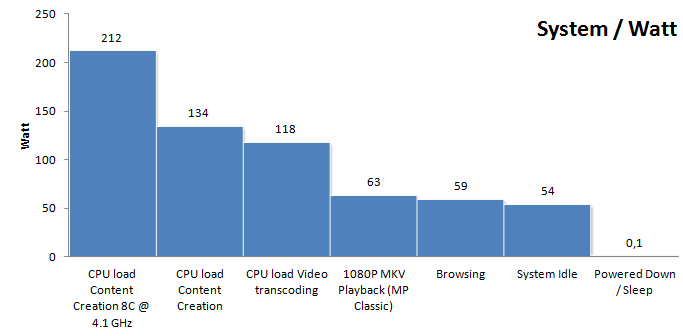
Power Consumption
Back to that tweak; adding that extra voltage on the CPU for the OC also has an adverse effect on the overall energy consumption. Under stress and overclocked we do use roughly ~200 Watts under full processor load. That is power consumption for the whole PC measured at the wall socket side including a GeForce GTX 1080 in idle. All characteristics we observe, measure and see look pretty similar to the 8-core 6900K in terms of heat and power consumption, clock frequency wise.